
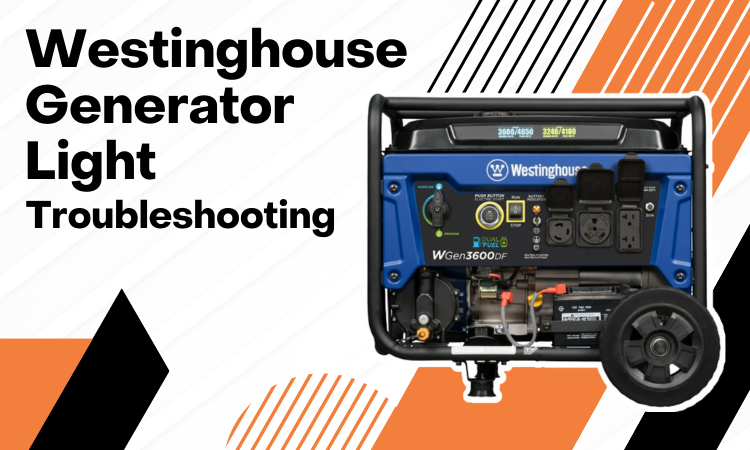
Westinghouse Generator Light Troubleshooting
Westinghouse generator often struggles with various problematic issues. Getting multiple lights is one of them.
So, how to do Westinghouse generator light troubleshooting?
Westinghouse generator triggers overload light due to excess load of electrical devices. So, you should reduce the load and reset the generator. For the battery indicator light, recharge or replace the battery. Add sufficient engine oil when the low oil light flashes. For the CO sensor light, relocate the generator to an open area.
This quick solution won’t help you out properly. Read the whole article to know the whole Westinghouse Generator Light Troubleshooting in a long detailed manner.
Contents
Westinghouse Generator Light Troubleshooting – Problem Reason and Solution
Let’s have a brief look at the common problem indicated by a Westinghouse generator light.
| Problem | Reason | Solution |
| Overload Light | Overload | Reset the generator |
| Battery Indicator Light | Low or Faulty Battery | Charge or replace the battery |
| Low Oil Light | Lack of engine oil | Add a sufficient amount of oil |
| CO Sensor Light | Improper location of the generator | Take the generator to an open space |
Now that you’ve got a clear understanding of the underlying problems, it’s time to solve them one by one.
Problem 1: Overload Light
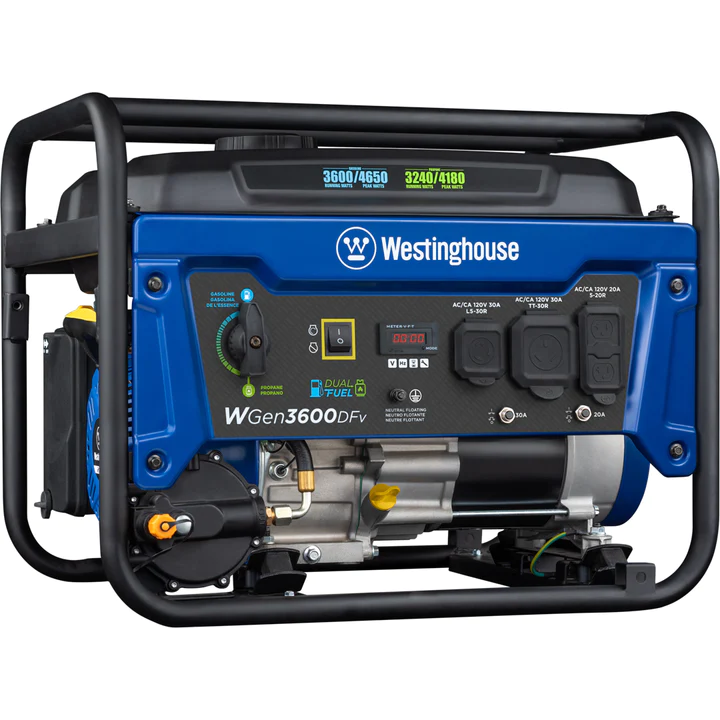
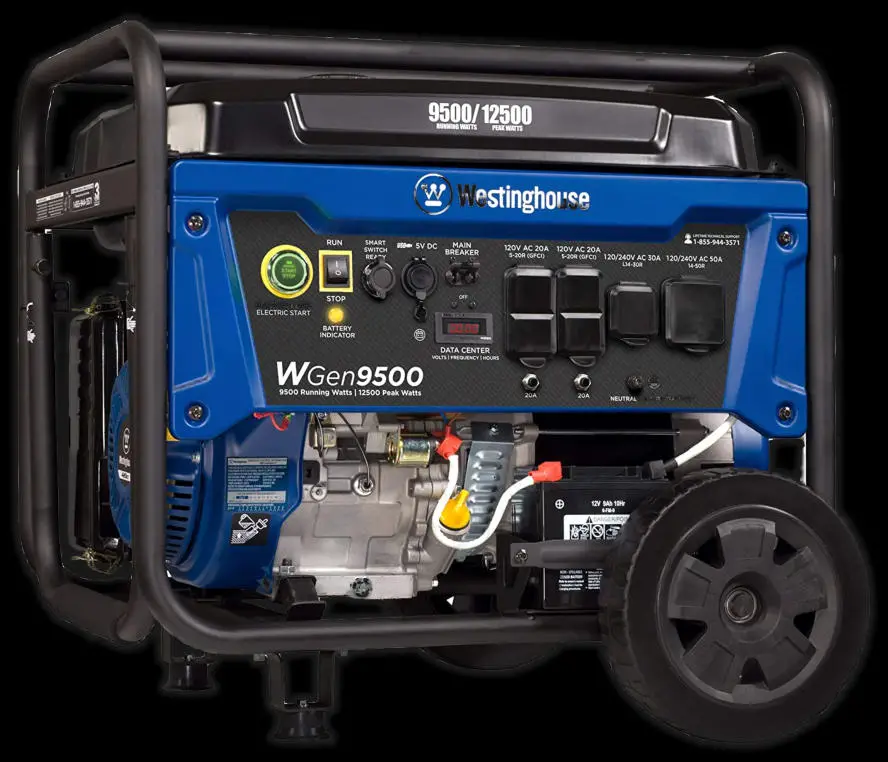
Generator overload is a common problem among users. If your Westinghouse generator faces this issue, it will turn off the OUTPUT READY LED and the OVERLOAD LED will flash.
To troubleshoot, start by checking the control panel. Additionally, inspect the control box and its components, such as the run stop switch, the 10A fuse, and the voltage connections. This can help identify and resolve any issues with the generator’s power functionality.
Reason: Electrical Overload
If you’re using electrical devices that surpass the capacity of your generator, it certainly makes the generator go into overload mode.
So, any kind of electrical surge or short circuit will trip the overload protection system by disconnecting the generator’s AC output even though the engine is still running.
Solution:
The solution for an overloaded Westinghouse generator is precise. You need to reset it. So, simply follow these steps to reset the generator back to its working condition.
- Turn off and unplug any electrical devices or cords from the 240-Volt AC, 12-Volt DC accessory, and 5-Volt DC USB receptacles on the control panel.
- Access the front panel to locate the reset button. Press the RESET button on the control panel until the overload alarm light goes off and the output indicator light is illuminated green.
- Reduce the connected load. Make sure the starting and running loads never exceed the generator’s capacity.
- Reconnect the electrical devices or cords to the control panel’s receptacles.
For iGen1200, 2200, and 2500 models to address the issue. You need to stop the generator completely and then restart it.
For the iGen4500 model, first, locate the generator reset button on the control panel. Press and hold this button until the overload alarm light turns off and the output indicator light illuminates green.
If you do find that the generator goes into overload mode while no electrical appliance is plugged in, the unit has a faulty AVR. In this case, you should contact the Westinghouse support center at +1 (855) 944-3571 instead of working on it on your own. Also, You can follow some tricks on how to fix overloaded generator as well at home.
Problem 2: Battery Indicator Light
Your Westinghouse generator’s battery indicator light usually turns GREEN after a successful recharge. But, if you find the light flashing YELLOW, it means the battery is not properly charged.
Reason: Lack of recharge or faulty battery
Lack of charge, corrosion in the terminals, or loose connection are primary reasons for battery light issues.
Solution:
First of all, make sure the battery is properly connected to the generator and the wires are not damaged. Then check for any corrosion in the terminals. If found, clean them with a brass brush and vinegar solution.
After regular maintenance, charge your generator for at least 6-8 hours or until the battery indicator light turns from red to green. If the battery fails to recharge properly after a prolonged period of time, the unit has become faulty to operate.
So, you need to replace it with a new one. For replacement follow the steps given below.
- Disconnect the old battery and remove it from the battery tray.
- On the new battery, connect the positive battery cable (red boot) to the positive terminal. Then connect the negative battery cable (black boot) to the negative terminal
- Secure the boots over the battery post. Then install the battery in the battery tray.
You can also see this video to properly do the replacement job.
Problem 3: Low Oil Light
Another common problem for your Westinghouse generator is having insufficient engine oil. It will trigger the “Low Oil’ RED light to maintain proper performance.
Reason: Lack of Engine Oil
Over regular use, engine oil decreases. As a result, your generator suffers in performance. Westinghouse company has put an in-built light that reminds you of the low oil condition of the generator.
Solution:
You need to add engine oil whenever the ‘Low oil’ light flashes. Follow the instructions given below for better understanding.
- Turn off the generator and let it cool for several minutes. Remove the engine access cover to get to the oil station.
- Remove the oil fill plug by unscrewing it anti-clockwise. Add oil until the surface is at the bottom lip of the oil fill plug opening.
- Re-install the plug and cover back.
Use premium quality 4-stroke engine oil with API classification of at least SF. An SAE 10W-30 oil is suitable for your Westinghouse generator. On the other hand, if you have a Generac 22kw generator, you must use the best oil for it. In order to avoid issues with low oil lights.
Problem 4: CO Sensor Light
Some of the costlier Westinghouse generators are equipped with a CO sensor. So, it will obviously get triggered if it senses carbon monoxide in the air.
Reason: Improper Location of the Generator
If you’re using the generator in an area that results in the accumulation of CO, likely in a partially enclosed area, it will trigger the sensor. It will shut off the engine and notify you with a RED indicator light. If it flashes YELLOW, the sensor has become faulty.
Solution:
Move the generator to an open, outdoor area. It should be far away from occupied spaces with exhaust pointed away. Once you relocate the generator to a safe area, it can be restarted.
For faulty sensor, it should be diagnosed and repaired only by professionals. Westinghouse recommends contacting their service center for this issue.
Only the Westinghouse generator doesn’t go through these kinds of issues. If you have a Duromax XP12000EH, you may encounter many problems like that. The problems with the Duromax XP12000EH must require troubleshooting
Conclusion
Now, you know how to do Westinghouse Generator light troubleshooting.
The troubleshooting provided in the article can help you fix any malfunctioning lights. You can easily do the solution provided in the article if you have the proper technical and professional knowledge. If you are unsure or do not have the knowledge please contact a professional.
Frequently Asked Questions(FAQs):
Why is my generator not kicking on?
A generator is not kicking may be due to a dead battery or faulty connections. You need to ensure that your battery is properly charged. Check all switches, including the main switch, for functionality. Then, a low fuel tank and low oil level in the engine can also lead to this issue. Ensure that there is sufficient fuel in the generator’s tank.
What is the common problem of generators?
The common problem with generators is battery failure. Usually, when batteries age, their power output diminishes gradually over time. If this problem persists then you need to replace the battery.
Why is my generator light shaking?
Your generator light is likely shaking because of vibrations from the generator’s engine. This can happen if the generator isn’t sitting on a stable surface or if there’s an issue with the engine’s balance or mounting.
Why is my generator not supplying light?
Your generator might not be supplying light for a few reasons, like a tripped circuit breaker, fuel problems, a bad voltage regulator, or a loose electrical connection. Using a volt meter to check the voltage at different points, such as from the battery to the frame or the ignition switch, can help find the problem. Getting help from a professional electrician can quickly fix these issues and get your lights working again.
